Friday 31 December 2010

Thermaltake Introducing The Toughpower 1350W Power Supply

Thermaltake, leading PC power supply and computer components brand, launch their all new 80 Plus Silver certified Toughpower 1350W power supply with up to 91% efficiency. Offering 8 PCI-E connectors, the Toughpower 1350W is ready for all current multi-GPU setups ranging from NVIDIA 3-Way/4-Way SLI to AMD CrossFireX configurations. The additional double-forward switching circuitry provides highest reliability by reducing power loss considerably, while the DC-DC converter further increases highest efficiency levels. The Toughpower 1350W maintains an ultra tight DC regulation thereby supporting the C6 CPU mode and hybrid graphics card power saving mode through its ZERO LOAD (0W) design.

The dual+12V rail design allows excellent performance under all types of system loading, in combination with 100% 105 ℃ / 212 ℉ Japanese electrolytic and solid state capacitors allow for decisively improved over-clocking performance, longer life time and increased reliability as well as stability even under higher operating temperatures, frequencies and currents. An 8pin CPU and a 4+4pin CPU connectors enable support for dual CPU gaming and mission-critical server applications. Cool performance and quiet operation is provided for by the ultra silent 14 cm fan with an automatic intelligent fan speed control.
Built-in industrial grade protection circuitries to protect the power supply from over current, over voltage, under voltage, over power, over temperature as well as short circuitry, make the Toughpower 1350W the safest choice of its kind.

In short, the Toughpower 1350W is guaranteed to deliver 1350W continuous power 24/7 @ 50 ℃ with up to 91% efficiency under real world load conditions in a multi-GPU setup. The Toughpower 1350 is designed for professional gamers with high demand of efficiency, stability and reliability.

www.customdesktops.moonfruit.com

AMD Mobility Radeon 7000 Series Leaked Before 2011

Shortly after finishing off the top-order of its Radeon HD 6000 series desktop discrete graphics processors (GPUs), AMD is letting out information about its first line of GPUs built on the 28 nanometer fabrication process. The first products carrying the Mobility Radeon HD 7000 series brand identifiers are notebook GPUs in the MXM 3.0 form-factor. AMD is planning an entire lineup top-to-bottom to address almost all mobile computing market segments. At the very low end of course would be its Fusion accelerated processing units with GPUs embedded. On top of that is what follows.

The lineup begins with "Wimbledon", an ultra high-end mGPU. It has a 256-bit wide high-speed GDDR5 memory interface, 2-4 GB of dedicated memory, and 65W TDP. The DirectX 11 GPU will be about 25% faster than "Blackcomb", the Mobility HD 6000 series flagship. This is slated for Q2-2012. Next up is the high-end "Heathrow" mGPU, which has a 192-bit or 128-bit (selectable between variants) GDDR5 memory interface, 1-3 GB of dedicated memory, up to 45W TDP, and 30% higher performance compared to "Chelsea". This is slated for Q4-2011 (this should tell you that Radeon HD 7000 series will be in existence towards the end of 2011).

Going down, there's "Chelsea" itself, with its 128-bit GDDR5 memory interface, 1-2 GB memory, 20-30W TDP, performance 30% higher than "Whistler", production starting in Q4-2011. Lastly, there's "Thames". This mainstream mGPU will have 128-bit GDDR5 with option of GDDR3, 1 GB memory, 15-20W TDP, and 100% higher performance than "Seymour", Radeon HD 6000 series' mainstream mGPU. Production for this starts in Q4-2011, as well.

http://unfusedjournal.blogspot.com/2010/12/amd-mobility-radeon-7000-series.html

Wednesday 29 December 2010

ASUS M4A89GTD PRO/USB3 Review


In terms of the 890GX and SB850 this motherboard is packed with features. This motherboard includes USB 3.0, eSATA, Core Unlocking, 1394 Firewire, Dual 16x Graphics slots and gloss blue aluminum coolers to help keep the chipset and VRM's at a stable temperature. This board also features on-board graphics using the HD4290 graphics chip. This graphics chip is no way a gaming chip but it is a lot better than some of the graphics that Intel are using on their boards. This board also makes use of 128mb DDR3 sideport memory to help speed up the on-board graphics. You can also use the onboard video as support for a discrete graphics card in what AMD call Hybrid CrossfireX mode. However unless the discrete card was slow itself then this would probably not offer much of a performance boost anyway. This board features 8+2 power phase. This will not mean much to most people that want to just use their computer but any one that is into a bit of overclocking will notice that this arrangement is more stable than lower phase power circuits. Another great feature that ASUS has included is the ASUS Express Gate. This is a mini operating system that the motherboard loads into if you want to just quickly check your email or have a quick look at something on the internet. This feature works really well as it loads a lot faster than a windows operating system. This board is also capable of running the quad and hex core CPU's that AMD are offering at the moment so you will not be short of power with this board.
This is the architecture that the 890GX Chip-set Uses


In conclusion ASUS has delivered a very high quality feature rich board for a the small price of £99.99 which is very much worth it. The only problem that I found with this board is the lack of a PS2 mouse port.

www.customdesktops.moonfruit.com

Sunday 26 December 2010

AMD ATI Graphics Card Chip Comparison Table

Chip
Core Clock
Memory Clock
Memory Interface
Memory Transfer Rate
Pixels per clock
DirectX
Radeon 9200
250 MHz
400 MHz
128-bit
6.4 GB/s
4
8.1
Radeon 9200 Pro
275 MHz
550 MHz
128-bit
8.8 GB/s
4
8.1
Radeon 9200 SE
200 MHz
333 MHz
64-bit
2.6 GB/s
4
8.1
Radeon 9250
240 MHz
400 MHz
128-bit
6.4 GB/s
4
8.1
Radeon 9250 SE
240 MHz
400 MHz
64-bit
3.2 GB/s
4
8.1
Radeon 9500
275 MHz
540 MHz
128-bit
8.6 GB/s
4
9.0
Radeon 9550
250 MHz
400 MHz
128-bit
6.4 GB/s
4
9.0
Radeon 9550 SE
250 MHz
400 MHz
64-bit
3.2 GB/s
4
9.0
Radeon 9500 Pro
275 MHz
540 MHz
128-bit
8.6 GB/s
8
9.0
Radeon 9600
325 MHz
400 MHz
128-bit
6.4 GB/s
4
9.0
Radeon 9600 Pro
400 MHz
600 MHz
128-bit
9.6 GB/s
4
9.0
Radeon 9600 SE
325 MHz
400 MHz
64-bit
3.2 GB/s
4
9.0
Radeon 9600 XT
500 MHz
600 MHz
128-bit
9.6 GB/s
4
9.0
Radeon 9700
275 MHz
540 MHz
256-bit
17.2 GB/s
8
9.0
Radeon 9700 Pro
325 MHz
620 MHz
256-bit
19.8 GB/s
8
9.0
Radeon 9800
325 MHz
580 MHz
256-bit
18.56 GB/s
8
9.0
Radeon 9800 Pro
380 MHz
680 MHz
256-bit
21.7 GB/s
8
9.0
Radeon 9800 SE
325 MHz
500 MHz
128-bit or 256-bit
8 GB/s or 16 GB/s
4
9.0
Radeon 9800 XT
412 MHz
730 MHz
256-bit
23.3 GB/s
8
9.0
Radeon X300 SE
325 MHz
400 MHz
64-bit
3.2 GB/s
4
9.0
Radeon X300
325 MHz
400 MHz
128-bit
6.4 GB/s
4
9.0
Radeon X550
400 MHz
500 MHz
128-bit or 64-bit
8 GB/s or 4 GB/s
4
9.0
Radeon X600 Pro
400 MHz
600 MHz
128-bit
9.6 GB/s
4
9.0
Radeon X600 XT
500 MHz
730 MHz
128-bit
11.68 GB/s
4
9.0
Radeon X700
400 MHz
600 MHz
128-bit
9.6 GB/s
8
9.0
Radeon X700 Pro
420 MHz
864 MHz
128-bit
13.8 GB/s
8
9.0
Radeon X700 XT
475 MHz
1.05 GHz
128-bit
16.8 GB/s
8
9.0
Radeon X800 SE
*
*
*
*
8
9.0
Radeon X800
400 MHz
700 MHz
256-bit
22.4 GB/s
12
9.0
Radeon X800 XL
400 MHz
1 GHz
256-bit
32 GB/s
16
9.0
Radeon X800 GT
475 MHz
**
128-bit or 256-bit
**
8
9.0
Radeon X800 GTO
400 MHz
1 GHz ***
256-bit
32 GB/s
12
9.0
Radeon X800 Pro
475 MHz
950 MHz
256-bit
30.4 GB/s
12
9.0
Radeon X800 XT
500 MHz
1 GHz
256-bit
32 GB/s
16
9.0
Radeon X800 XT PE
520 MHz
1.12 GHz
256-bit
35.8 GB/s
16
9.0
Radeon X850 Pro
520 MHz
1.08 GHz
256-bit
34.56 GB/s
12
9.0
Radeon X850 XT
520 MHz
1.08 GHz
256-bit
34.56 GB/s
16
9.0
Radeon X850 PE
540 MHz
1.18 GHz
256-bit
37.76 GB/s
16
9.0
Radeon X1050
****
****
****
****
4
9.0c
Radeon X1300 HM
450 MHz
1 GHz
128-bit or 64-bit or 32-bit
16 GB/s or 8 GB/s or 4 GB/s
4
9.0c
Radeon X1300
450 MHz
500 MHz
128-bit or 64-bit or 32-bit
8 GB/s or 4 GB/s or 2 GB/s
4
9.0c
Radeon X1300 Pro
600 MHz
800 MHz
128-bit or 64-bit or 32-bit
12.8 GB/s or 6.4 GB/s or 3.2 GB/s
4
9.0c
Radeon X1300 XT
500 MHz
800 MHz (DDR2) or 1 GHz (GDDR3)
128-bit
12.8 GB/s or 16 GB/s
12
9.0c
Radeon X1550
450 MHz or 550 MHz or 600 MHz
 800 MHz
64-bit or 128-bit
6.4 GB/s or 12.8 GB/s
4
9.0c
Radeon X1600 Pro
500 MHz or 575 MHz
780 MHz
128-bit
12.48 GB/s
12
9.0c
Radeon X1600 XT
590 MHz
1.38 GHz
128-bit
22.08 GB/s
12
9.0c
Radeon X1650 Pro
600 MHz
1.40 GHz
128-bit
22.40 GB/s
12
9.0c
Radeon X1650 XT
575 MHz
1.35 GHz
128-bit
21.60 GB/s
24
9.0c
Radeon X1800 GTO
500 MHz
1 GHz
256-bit
32 GB/s
12
9.0c
Radeon X1800 XL
500 MHz
1 GHz
256-bit
32 GB/s
16
9.0c
Radeon X1800 XT
625 MHz
1.5 GHz
256-bit
48 GB/s
16
9.0c
Radeon X1900 GT
575 MHz
1.2 GHz
256-bit
38.4 GB/s
36
9.0c
Radeon X1900 XT
625 MHz
1.45 GHz
256-bit
46.4 GB/s
48
9.0c
Radeon X1900 XTX
650 MHz
1.55 GHz
256-bit
49.6 GB/s
48
9.0c
Radeon X1950 GT
500 MHz
1.2 GHz
256-bit
38.4 GB/s
36
9.0c
Radeon X1950 Pro
575 MHz
1.38 GHz
256-bit
44.16 GB/s
36
9.0c
Radeon X1950 XT
625 MHz
1.8 GHz
256-bit
57.6 GB/s
48
9.0c
Radeon X1950 XTX
650 MHz
2 GHz
256-bit
64 GB/s
48
9.0c
Radeon HD 2400 Pro
525 MHz
800 MHz
64-bit
6.4 GB/s
40 *****
10
Radeon HD 2400 XT
700 MHz
1.6 GHz
64-bit
12.8 GB/s
40 *****
10
Radeon HD 2600 Pro
600 MHz
800 MHz
128-bit
12.8 GB/s
120 *****
10
Radeon HD 2600 XT
800 MHz
1.6 GHz (GDDR3) or 2.2 GHz (GDDR4)
128-bit
25.6 GB/s (GDDR3) or 35.2 GB/s (GDDR4)
120 *****
10
Radeon HD 2900 GT
600 MHz
1.6 GHz
256-bit
51.2 GB/s
240 *****
10
Radeon HD 2900 Pro
600 MHz
1.85 GHz
512-bit
118.4 GB/s
320 *****
10
Radeon HD 2900 XT
740 MHz
1.65 GHz (GDDR3) or 2 GHz (GDDR4)
512-bit
105.6 GB/s (GDDR3) or 128 GB/s (GDDR4)
320 *****
10
Radeon HD 3450 ^
600 MHz
1 GHz
64-bit
8 GB/s
40 *****
10.1
Radeon HD 3470 ^
800 MHz
1.90 GHz
64-bit
15.2 GB/s
40 *****
10.1
Radeon HD 3650 ^
725 MHz
1 GHZ (DDR2) or 1.6 GHz (GDDR3)
128-bit
16 GB/s (DDR2) or 25.6 GB/s (GDDR3)
120 *****
10.1
Radeon HD 3690 ^
668 MHz
1,656 MHz
128-bit
26.5 GB/s
 120 *****
10.1
Radeon HD 3850 ^
670 MHz 
1.66 GHz
256-bit
53.12 GB/s
320 *****
10.1
Radeon HD 3870 ^
775 MHz
2.25 GHz
256-bit
72 GB/s
320 *****
10.1
Radeon HD 3870 X2 ^  +
825 MHz
1.8 GHz
256-bit
57.6 GB/s
320 *****
10.1
Radeon HD 4350 ^
600 MHz
1 GHz
64-bit
8 GB/s
80 *****
10.1
Radeon HD 4550 ^
800 MHz
1.6 GHz
64-bit
12.8 GB/s
80 *****
10.1
Radeon HD 4650 ^
600 MHz
1 GHz or 1.4 GHz
128-bit
16 GB/s or 22.4 GB/s
320 *****
10.1
Radeon HD 4670 ^
750 MHz
2 GHz (512 MB) or 1,746 MHz (1 GB)
128-bit
32 GB/s or 27.94 GB/s
320 *****
10.1
Radeon HD 4730 ^
750 MHz
1.8 GHz
128-bit
28.8 GB/s
640 *****
10.1
Radeon HD 4770 ^
750 MHz
3.2 GHz
128-bit
51.2 GB/s
640 *****
10.1
Radeon HD 4830 ^
575 MHz
1.8 GHz
256-bit
57.6 GB/s
640 *****
10.1
Radeon HD 4850 ^
625 MHz
2 GHz
256-bit
64 GB/s
800 *****
10.1
Radeon HD 4850 X2 ^ +
625 MHz
2 GHz
256-bit
64 GB/s
800 *****
10.1
Radeon HD 4870 ^
750 MHz
3.6 GHz
256-bit
115.2 GB/s
800 *****
10.1
Radeon HD 4870 X2 ^ +
750 MHz
3.6 GHz
256-bit
115.2 GB/s
800 *****
10.1
Radeon HD 4890 ^
850 MHz
3.9 GHz
256-bit
124.8 GB/s
800 *****
10.1
Radeon HD 5450 ^
650 MHz
800 MHz (DDR2) or 1.6 GHz (DDR3)
64-bit
6.4 GB/s (DDR2) or 12.8 GB/s (DDR3)
80 *****
11
Radeon HD 5550 ^
550 MHz
 (varies)
128-bit
 (varies)
320 *****
11
Radeon HD 5570 ^
650 MHz
1.8 GHz
128-bit
28.8 GB/s
400 *****
11
Radeon HD 5670 ^
775 MHz
4 GHz
128-bit
64 GB/s
400 *****
11
Radeon HD 5750 ^
705 MHz
4.6 GHz
128-bit
73.6 GB/s
720 *****
11
Radeon HD 5770 ^
850 MHz
4.8 GHz
128-bit
76.8 GB/s
800 *****
11
Radeon HD 5830 ^
800 MHz
4 GHz
256-bit
128 GB/s
1,120 *****
11
Radeon HD 5850 ^
725 MHz
4 GHz
256-bit
128 GB/s
1,440 *****
11
Radeon HD 5870 ^
850 MHz
4.8 GHz
256-bit
153.6 GB/s
1,600 *****
11
Radeon HD 5970 ^ +
725 MHz
4 GHz
256-bit
128 GB/s 
1,600 *****
11
Radeon HD 6390 ^
550 MHz
(varies)
128-bit
(varies)
320 *****
11
Radeon HD 6850 ^
775 MHz
4 GHz
256-bit
128 GB/s
960 *****
11
Radeon HD 6870 ^
900 MHz
4.2 GHz
256-bit
134.4 GB/s
1,120 *****
11
Radeon HD 6950 ^
800 MHz
5 GHz
256-bit
160 GB/s
1,408 *****
11
Radeon HD 6970 ^
880 MHz
5.5 GHz
256-bit
176 GB/s
1,536 *****
11

Call Of Duty: Black Ops Reaches the $1,000,000,000 Mark

Call of duty, One of the biggest games franchises ever has reached the sales mark of $1,000,000,000. The company that owns Call of Duty, Activision has announced that the game has reached the $1 billion mark since it launched in november. That is a mighty acheivment for a game. Well done activision.


www.customdesktops.moonfruit.com
Obama Says That Steve Jobs Deserves To Be Rich

While at a White House press confrence, Obama talks about how people in America all have a chance of becoming rich if they come up with with right product.

"And something that's always been the greatest strength of America is a thriving, booming middle class, where everybody has got a shot at the American dream. And that should be our goal. That should be what we're focused on. How are we creating opportunity for everybody? So that we celebrate wealth. We celebrate somebody like a Steve Jobs, who has created two or three different revolutionary products. We expect that person to be rich, and that's a good thing. We want that incentive. That's part of the free market."

www.customdesktops.moonfruit.com

Saturday 6 November 2010

How To Defrag Your Hard Drive In Windows XP

To De-fragment your hard drive go to

1) My Computer
2) Right click on A Hard Drive Symbol
3) Click Properties
4) Click on the Tools Tab
5) Find the button that says Defragment Now And click on it
6) Select the drive that needs defragmenting from the list at the top
7) Click Defragment in the bottom left corner
8) The computer will do the rest.

After you have done this you will most likely notice a performance boost. It may be a small amount of difference or a lot depending on whether or not you have ran a defrag program before..

Wednesday 3 November 2010

PCI Blower Exhaust Fan Graphics Card Cooler Review

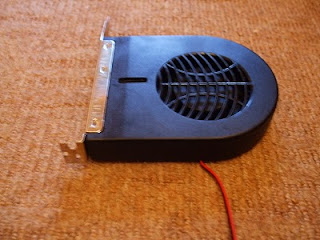
If you, like me have a graphics card that doesn't have a fan on it and is cooled by a large piece of metal then you may have noticed that some cards get a little toasty when being used. I decided to buy a PCI cooler exhaust fan to see what difference it made to the temperature of my graphics card. I took a couple of photos of the cooler so that you can see it's design and how it looks close up.


As you can see the blower is not massive. It is about 80mm and the output is the size of the rear expansion ports on the back of the computer case. I first took an idle reading of the temperature of the graphics card. I left the computer on for 30 minutes without anything running other than CPUID Hardware Monitor. It reached a maximum temperature of 49c. Which is quite high for idle. You can see the temperature reading in the bottom left of the temperatures.
I then installed the PCI blower fan in the slot directly below the graphics card with the blower fan almost touching the fins of the heatsink. As you can see in the following image.
I turned the computer on and put my hand behind the blower fan. To my supprise it was quite powerful and I could feel a fair ammount of air coming out which is definaltly a good sign. It also wasn't that loud and did not effect the overall volume of the PC. I then opened CPUID Hardware Monitor and check the temperatures. They had dropped by a full 10c which is very impressive.
As you can see a very good improvement for something so cheap and so available. You can also get more expensive models with even better CFM which would cool even more. Now as for the rumor that these things interrupt the cooling flow to the CPU. If you have a quick look at the before and after photos you will also notice a 1c drop in the temperature of the CPU as well. That could well just have happened by accident but I am not sure. The positive thing is that it didn't make the temperature of it higher so that have proved the theory wrong.
Overall I was very impressed with the way the blower fan worked and in my opinion it is a great design.
Thanks for reading, Jack-O-Bytes

Related Articles;

Saturday 30 October 2010

How To Upgrade and Change A Computer Power Supply Unit PSU

When you upgrade hardware inside your computer more energy is needer to power the new parts. If the PSU cannot provide enough power to the computer parts then you get random crashes and instability. This can be solved by installing a higher wattage PSU from a reputable brand such as Corsair, OCZ, or Coolermaster. This is a shot instructional video showing how to change the PSU in your computer.


Thanks for watching, Jack-O-Bytes
www.customdesktops.moonfruit.com

Gigabyte M68M-S2P S-Series AM2+ Motherboard Review

Hello there and welcome to Jack-O-Bytes reviews. In this post I am going to be talking about the cheap but cheerful Gigabyte M68M-S2P AM2+ motherboard. The Gigabyte M68M-S2P is aimed mainly at the budget computer market and is very cheap and cheerful. It is based around the AM2+ motherboard socket. The M68M-S2P also has the ability to run some of the newest AMD Phenom 6 core CPU's.

I have used this board in 2 of my PC builds so far and I have found them very easy to install and setup. This board is designed for budget builds around the £200-£400 ($320-$640) area. Even though this board costs only £32 ($51) it comes with some very nice features that you would expect to find only on  more expensive boards. These include a 3+1 phase power design that uses solid capacitors and also AM3 CPU support for up the Phenom II x6 1055T CPU. This basically means that for £32 ($51) you can get a motherboard that is capable at supporting full 6 core CPU's.


This motherboard has the following output and inputs on the I/O panel;

  • 1 x PS/2 keyboard port
  • 1 x PS/2 mouse port
  • 1 x parallel port
  • 1 x serial port
  • 1 x D-Sub port
  • 4 x USB 2.0/1.1 ports
  • 1 x RJ-45 port
  • 3 x audio jacks (Line In / Line Out / MIC In)
As you can see it still has the standard PS2 keyboard and mouse plugs which in my opinion are a good thing as not all people have moved onto USB peripherals. It also has one parallel port as well which I don't see much use of as many boards have done without these for quite a while and I don't really know any one that still uses one. It also has a serial port which also seems a little out of date. Of course some people still use these features so gigabyte have added them any way. The only video output on this board is a VGA D-Sub port which for some people may not be all that great. Many other boards now use DVI and/or HDMI plugs instead. Of course many people still use VGA instead of DVI so that is a fair move by Gigabyte considering they have also added serial and parallel ports. It seams as though this board is aimed at people that want the performance of a new computer but do not want the costs of replacing all their other peripherals as well. The Gigabyte M68M-S2P only has 4 USB ports on the back but for a £32 ($51) I don't see this as a bad amount. It has a gigabit Ethernet port which is easily fast enough for almost every ones Internet and home network systems as well. The main let down on this board is that even though it features 7.1 channel audio it only has 3 3.5mm jack sockets. This means that when you want either 5.1 or 7.1 channel audio you loose use of the microphone and line in plugs.

This motherboard has the following internal connectors;
  • 1 x 24-pin ATX power connector
  • 1 x 4-pin ATX 12V power connector
  • 1 x floppy connector
  • 1 x IDE connectors
  • 4 x SATA 3Gb/s connectors
  • 1 x CPU fan connector
  • 1 x system fan connector
  • 1 x front panel connector
  • 1 x front panel audio connector
  • 1 x CD In connector
  • 1 x SPDIF In/Out connector
  • 2 x USB 2.0/1.1 connectors for additional 4 USB 2.0/1.1 ports by cables
  • 1 x clearing CMOS jumper
This board uses the standard 24 pin motherboard power socket which is located next to the RAM slots. This is the ideal place to have the plug as it leads the thick power lead from the PSU away from the CPU area and thus avoiding the cable getting stuck in the CPU fan or getting in the way of mounting an aftermarket heatsink. This board also has a 4 pin power connector that is next to the CPU socket in the top left of the board. This is also in a good place as it allows you to route the cable over the PSU and down into the socket thus avoiding the CPU heatsink and fan again. I am happy to see that gigabyte have also included a floppy disk connector on the M68M-S2P board as this shows that it is again thinking about people that may still use legacy components and formats. The M68M-S2P also has 1 IDE port that is great for people that want to just upgrade their motherboard, RAM, and CPU without having to get a new SATA hard drive. This board has 4 SATA 3GB/s connectors great for if you want to setup a computer with multiple hard drives for backups or data storage. It also has support for RAID 0,1, 5,  and 10. This is great as you can create high performance drive setups.


The quality of this board feels very solid. It has solid capacitors around the CPU which shows quality as they cost more and are more reliable than regular electrolytic capacitors. The M68M-S2P also looks good quality as all the other capacitors are perfectly vertical and none are leaning over suggesting that the board has been put together well. The last small sign of higher quality is the colour scheme. Having components with matching colours shows that some thought and attention has gone into making this board look good as well as perform good. It also shows that they haven't just been sloppy and used whatever parts were available at the time of manufacture or whichever were offered cheapest.


Overall I would say that this motherboard is medium quality using high quality solid capacitors in the most importand area and then high quality electrolytic capacitors elsewhere to help keep the price down a little. CPU support is great and the RAM support of up to 1066Mhz speed is OK but not as good as the newer DDR3 motherboards that have been released. What more can you want though from a great budget board other than stability, ease of setup, performance, and high support for old and some newer technologies.

Thanks for reading, Jack-O-Bytes

Related Articles;

Western Digital Caviar Black Hard Drive Review

I purchased the Western Digital Caviar Black as an upgrade over an older IDE drive. I chose the Caviar Black as it has better performance than the Caviar Green and Caviar Blue. I installed the drive with a Foxconn A6VMX motherboard and an Athlon 64 x2 5600.


Specs
Storage Ammount: 500, 640, 750, 1000, 2000
High Speed Cache: 32mb (64mb on only 2tb model)
Processor: Dual Processor (Allows for more data to be transfered quicker)

Quality
This hard drive seems to be very well built. It is heavy and has a very strong metal top and strong metal sides. This is a very positive thing for a hard drive as sometimes people knock them when trying to install them. It is built well and feels very sturdy.

Performance
I have had this hard drive for about 2 months now and in the time I have had it I have seens a very good increase in performance over an older Samsung F1 IDE drive. I did a few performance tests and these are the results;
  • Random Access: 12.3ms
  • Average Read: 78mb/s
  • Burst Speed: 220.4mb
As you can see from those results this hard drive has very good performance. These are the performance figures on the well known Samsung Spinpoint F3
  • Random Access: 13.8
  • Average Read: 124.8
  • Burst Speed: 258.9
As you can see. The Western Digital Caviar Black struggles to keep up with the F3 drive. I do however think that me having it partitioned into 3 peices and have a full XP install and loads of programs probably lowered it chances against the F3 so I would add a little performance to each of the Caviar Blacks results.

Noise and Temperature
This hard drive is very quiet for a performance drive. It isn't audiable at all over the noise of my fans in my computer. It does also stays very cool with temperatures ranging in my setup from 29c-34c. This is easily cool enough to help it continue working correctly for a long time.

That is all for this review,
Jack-O-Bytes

Wednesday 27 October 2010

How to speed up your computer using free available programs

This is a short guide one how to speed up your computer/laptop using free available tools that you can download and install quickly and easily.
  • Once you have done that close as many programs as possible. This will mean that CCleaner can work more efficiently and quicker as well. You will most likely have to close your Internet browser so it may be a good idea to bookmark this page so you can open it again.
  • Firstly open CCleaner and click the "Run Cleaner" button in the bottom right of the program. This will then clean out all of the temporary files and unused folders that build up on your computer over time. Once that has completed click on the "registry" tab on the left of the program and then click scan for issues at the bottom middle of the program. Once it has scanned it will have a list of broken/unneeded registry entries that will be slowing your computer down. Click fix selected issues in the bottom right of the program and then it will ask if you want to back up your registry. Click yes and save the file somewhere that you can access easily such as your documents. Another box will then come up. Click fix selected issues and then you are done with that program.
  • Next close CCleaner and open up Auslogics Registry defrag. Click on analyze in the bottom right of the program. It will then scan the registry for fragmented areas which will be slowing the computer down. Once it has done that click on the little "Defrag Now" button that comes up once scanning is complete. The computer will restart and automatically defrag the registry for you. Make sure that you do not switch of the computer during this process. Log back into the computer and then the registry defrag program will come back up. Click finish or just close the program.
  • Once you have closed Registry Defrag you now need to open Auslogics Disk Defrag. Once the program is open click on the down arrow that is next to the "defrag" button that is located near the top left of the program and then click "Defrag and Optimize" This part of the process may take a while but it will be well worth it at the end. Little blocks will start to apear on the program that are coloured either green or red. Red is the fragmented parts and green is the non fragmented parts. As the program runs the red will turn to blue which means Defragmented. Once the program has finished you are now ready to enjoy a speedy computer.
  • Thanks for reading and I hope you enjoy your new speedy computer, Jack-O-Bytes

www.customdesktops.moonfruit.com