Showing posts with label how to. Show all posts

Tuesday, 10 January 2012

How to fully Uninstall / Remove Drivers

When changing a graphics card, sound card, or network card sometimes removing the drivers properly can be a bit of a pain. It can also be a problem when updating drivers to the newer versions as often the uninstall program will not fully delete all of the driver components and will often cause the new drivers to not install correctly which can cause crashes and sometimes even blue screens of death.

There are a couple of free programs out there though that will help you fully remove the drivers so that when installing the new ones you don't hit any problems along the way.

Firstly you will need to download Driver Sweeper once you have downloaded it simply install it and then leave it until you have started the task of removing the old drivers. (Remember to get the new ones ready on a CD or on your desktop before you remove the old ones)

Once you have decided on which drivers you are uninstalling you need to go to the uninstall panel on your computer. Find the drivers and then right click on them and click uninstall/change. Go through all of the setup program until the drivers are uninstalled.

Uninstall or Change a program window
Once you have removed the drivers that you wanted to get rid of it is time to fire up Driver Sweeper. This program will remove any remaining files/registry entries that were left by the driver uninstall program. Select the names of the drivers that you are trying to remove. In my case it was;

Nvidia - Display
Nvidia - PhysX

Driver Sweeper - Select driver window
Once you have selected the drivers that you are removing (Already removed using the uninstall or change a program window) you need to click analyze. This will scan your computer for any remaining files and registry entries that were connected to the driver. Once it has finished you will find a program panel like this come up.

Driver Sweeper Scan Results
Once you have seen all of the files and registry entries you simply click on the "Clean" button in the bottom right hand side of the screen. Once this task has been performed it is now time to install your new driver.

Thanks for reading, Jack-O-Bytes

Saturday, 29 October 2011

How to keep your PC computer running as fast as possible

Hello everyone, In today's post I am going to be looking at how you can keep your PC running as fast as possible without having to make any hardware changes at all. This guide will show you how to keep your PC software in top condition and keep it running quickly and efficiently. I will include some free programs that I currently use that keeps my PC running at top performance, Often my cheap computer will out perform more expensive ones because I take care of the software side of my PC.

The first step to increasing the performance of your PC is to make sure that there is no junk on the computer that will take up space and slow the hard drive performance down. To do this I recomend that you download and install CCleaner and CCEnhancer. Once you have downloaded them, Install CCleaner first and then install CCenhancer after. Once CCenhancer is installed open CCleaner and then on the left hand side tick all of the tick boxes apart from "Wipe free disk space"
Once you have ticked all the boxes apart from "Wipe free disk space" click on the tab at the top of that section that says "Applications" Once you have clicked that, Tick all of the boxes in the section that appears to make sure that you are removing all of the junk on your computer. If you would like under this section you can opt not to delete "Saved form information" and "Saved passwords" under Internet explorer, Firefox, Google chome, and Opera. This means that any saved passwords will still exist after you run this program.

Once you have selected all of the tick boxes click "Run cleaner" in the bottom right hand side of the screen. This will set the cleaner to work digging out and deleting all of the rubbish documents and folders that have built up over the course of using your PC. Once that section of the program has finished you can now move onto it's next part.

Click on the big icon on the left hand side that says registry. Once you have that section open, Click all of the tick boxes on the screen so that it cleans every section of the registry.
Once all of the tick boxes are selected, click on scan for issues. Once it has finished scanning a list of damaged/broken registry entries will be shown on the screen. You can now clock on fix selected issues and it will fix all the registry problems.

Now it is time to Defrag your hard drive to help regain the performance that it originally had before you installed and uninstalled programs and files. Defragging arranges the files and folders on the hard drive so that they are all in order which makes loading times much faster. Firstly download Defraggler. Once you have installed Defraggler open it and then click on the hard drive that you would like to defrag at the top of the screen as show in this image.
Once the drive has been selected click on the Defrag button that is located at the bottom left hand side of the program. This will set the program to defrag you hard drive. It is best to close as many programs as possible when doing this as that means that more of the files and folders can be defragged. Once it has started leave the computer and just let it finish this task on it's own as it can take quite a long time on a hard drive that hasn't been defragged often.

Once Defraggler has been finished it is often a good idea to run an Anti-Virus scan as well. I would suggest that you make sure your anti-virus program has the newest updates and virus definitions (which most programs do on there own anyway) and then run the program to do the most in-depth scan you can and let it complete it. As there are many different anti-virus programs out there I cannot really show you how to do this one in depth.

Once all of those tasks have been finished the computer should be a lot more responsive and fast running. I have bought back many PC's that people have thought to have been broken by using these 3 simple programs and everyone has been surprised at what a speed improvement they got.

Thanks for reading, Jack-O-Bytes

Related Articles;

Saturday, 30 July 2011

Newegg - How to build a desktop PC

This video has been created by the hardware retail giant, Newegg. They have made this video showing how to build a desktop PC and I was very impressed with how they managed to get everything into it. It is 45 minutes long so be prepared to watch it. However the detail they go into is brilliant.

Thursday, 14 July 2011

How to Speed up your Computer

Hello everyone, In this post I am going to give you a walk through guide on how to speed up your computer using some simple freely available software tools. These programs have all been personally used by me and I have found that they are all reliable and easy to use so any one can do it.

Firstly we are going to download the programs needed to speed up your computer. These programs work on Windows XP, Vista, and Windows 7. I am going to be using a windows XP computer as my windows 7 has a faulty PSU at the moment which I will hopefully be fixing soon which I will upload in a post.

CCleaner - http://filehippo.com/download_ccleaner/
Auslogics Disk Defrag - http://filehippo.com/download_auslogics_disk_defrag/

Once you have downloaded the programs to your computer you can begin to install them. This won't take long as they are only small software packages.

Installing CCleaner
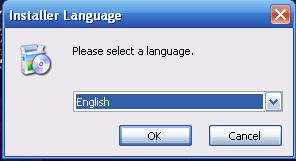
Firstly open where you have downloaded the install file to and then run it. This will open up a box that will say unpacking program. Depending on how fast your computer is you may not see this part. The first option that will come up is the language option. Simply select the language you need and then click OK.
Once you have selected the language click next a few more times and then you will get to the Install Options section. This is where you decide what the program installs and how you want it to run.
I usually leave all of them ticked as Piriform (the company that makes CCleaner) usually doesn't try to make you install a load of promotional add-ons that other companies do. Click install and the rest is done for you. Once it has finished un-tick the run CCleaner option and then click finish.

Installing Auslogics Disk Defrag
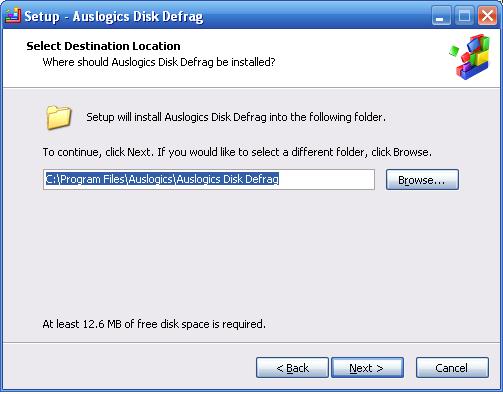
Once CCleaner has been installed it is time to install Auslogics Disk Defrag. This is a great program and is a lot better than the Disk defragger that comes standard with Windows. This is also the program that will speed up the computer the most. Once the install is started click next on the first window, Then click on the button that says "I accept the License agreement" and click next. You can now select where you want to install the program.
I usually change this to my faster E: drive but you can leave it on the standard C: drive and it will work fine. If you don't have enough free space on the C: drive then you can change the location by clicking the browse button. Once you are happy with where it is going to install click the next button three times and it will start the install. Once it has finished installing un-tick the "Launch Auslogics Disk Defrag" button so that it doesn't load up. Then click the finish button.


Running CCleaner
Now comes another easy part. Open up CCleaner so that you are at this stage.
Once you are hear you can select and de-select as many of the options as you want on the left hand side. I usually tick all of them apart from the "Wipe free space" as that way you free up the most space possible. If you don't know what any of the things are it is best to keep them set to standard. Once you are happy with the selection click on the "Run cleaner" button in the bottom right of the program. You will be told that this will delete items on your computer. Click OK. This will start the cleaner. Depending on how much junk there is on your computer this could take a long time to complete. The longest I have seen was about 10 minutes. Once that has completed click on the "Registry tab" on the left hand side. This is shown by the arrow on the image below.
Once the tab is open then you can click the "Scan for issues" button that is in the bottom middle of the program. Shown by the arrow below.
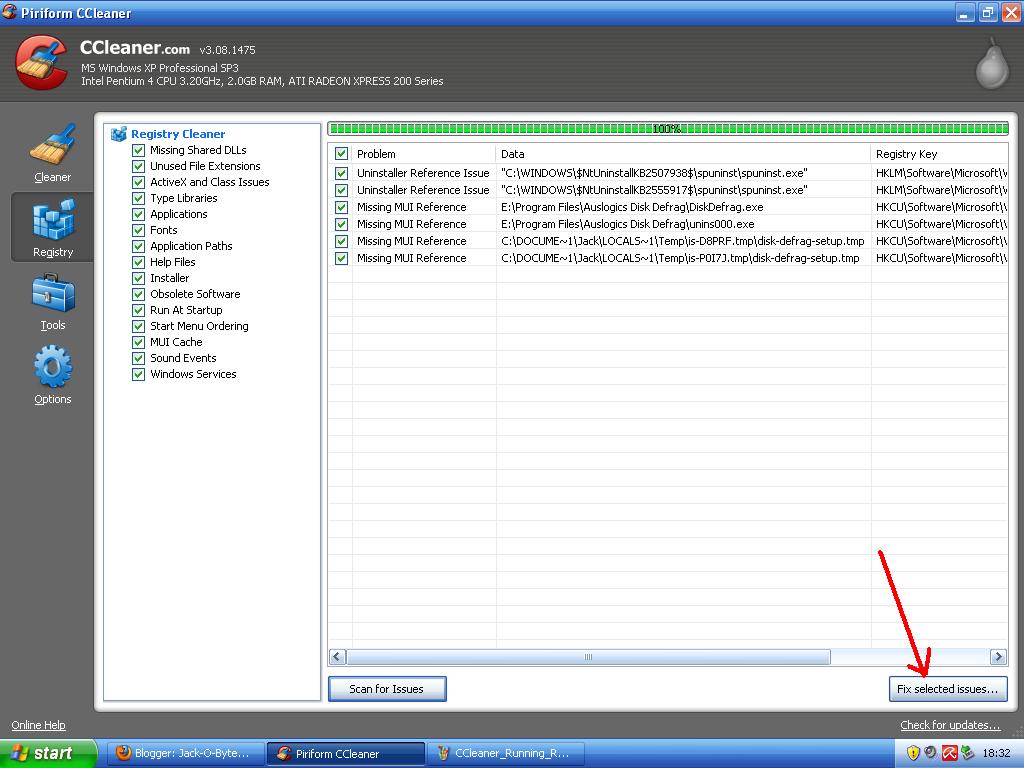
Once that scan has completed a list will appear of the damaged registry files.You will now need to click on the "Fix selected issues" button in the bottom right of the program. This is shown by the arrow in the image below. It will ask if you want to backup your registry click yes and then save the file somewhere in your documents.
Once this has been completed we are finished with CCleaner and can now move onto defragging the hard drive. This will speed up the computer if it hasn't been done before as it will arrange the files on your hard drive so that they are not spread out and so that they load quicker.

Running Auslogics Disk Defrag
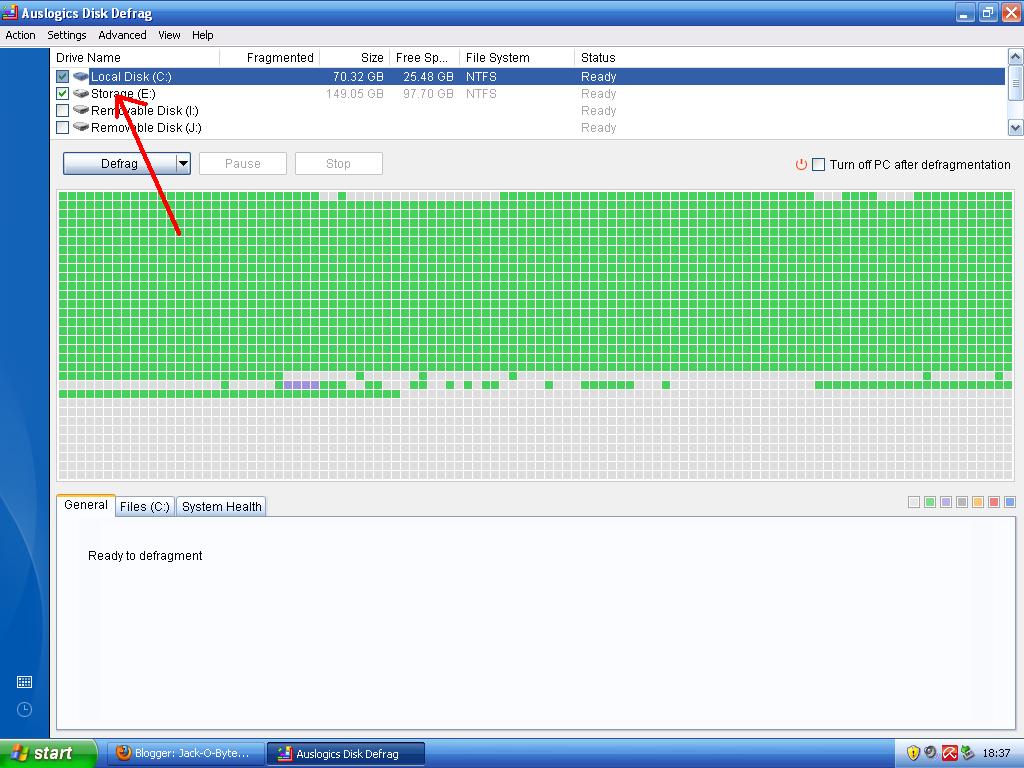
Open up Auslogics Disk Defrag and then select the drives that you use from the list at the top of the program.
Once you are happy with the drive selection simply click on the "Defrag" button or if you want you can hold the arrow down next to the "defrag" button and select "Defrag and Optimize" This will arrange the files in order of when they are needed so that windows loads up quicker and acts more responsive.
Once you have clicked on the button it will start defragging your computer. This could take anywhere between 10 minutes to 4 hours and depending on how long it runs will make a lot of difference to the performance of your PC. If it takes a long time then there was a lot to be defragged and it will speed up the PC loads. Once that program has finished defragging your computer you should have a much faster and smoother running PC. You will most likely notice the speed difference as well.
Thanks for reading and I hope that you have found these instructions useful.

Related Articles;
How to speed up your computer using freely available programs - Old Version of this post